
So, you have built your PC or are putting together a spec and you have decided you want to add a bit of "RGB" lighting inside to highlight the hardware inside or have a visual effect that frankly looks cool. There are ultimately quite a few ways you can go about it, we are here to explain your options and hopefully guide you to be able to do it the proper way and save a pile of cash at the same time.
Before we start, for the majority of this guide we will be talking about RGB in its commercial form, nearly every manufacturer when it comes to end product calls PC lighting RGB. This technically wrong but the world has adopted it so we will try to play along as nicely as possible.
The reality is modern RGB lighting is actually called ARGB (Addressable RGB) or DRGB (Digital RGB) lighting. RGB is a hangover from the early days of when RGB strips simply displayed one single choosable colour - IE you could have your whole strip light up Red or say Blue, if this was a strip of say 5 LEDs every single LED would be red if you set red or blue if you set blue. ARGB lighting is where you can light up each individual LED your chosen colour sometimes refereed to as IC (individually controlled). On the same 5 Led strip example you could have Red, Blue, Green, Blue, Red at the same time. Lighting effects which we all know and love are significantly better with ARGB LEDs than just RGB LEDs and ARGB will do everything RGB can do and much more. We did cover the whole ARGB and RGB difference back in 2022 and if you are reading this you will be building or buying something based off of ARGB technology.
Case fans
The first thing you will probably come across is the plethora of case fans available to you and the chances are you may have a case or plan to have a case that comes with RGB case fans. There are literally a dozen options from dozens of different manufacturers out there and it is daunting as to which ones to go for. If you have built your own system or are planning to build one you probably already have an idea of what fans you want, how many you want, how quiet you want them to be and hopefully worked out your positive and negative air pressure setups so that you are actually installing your fans optimally rather than putting form over function which we find is the biggest mistake out there. So first and foremost, when it comes to RGB fans they all pretty much do the same thing nowadays. Of course they do have variations and come installed to different types of fan but when it comes down to the form side of things they all have similar LED types, their own manufacturer software and hardware to control them. They are all going to light up and show a fancy effect on them. The key takeaway from RGB fans is that they will light up the fans and very little light is actually projected within the PC itself. Inside will still look dark and you are going to be disappointed if you are wanting to see the components inside or actually light up the inside of the case itself;
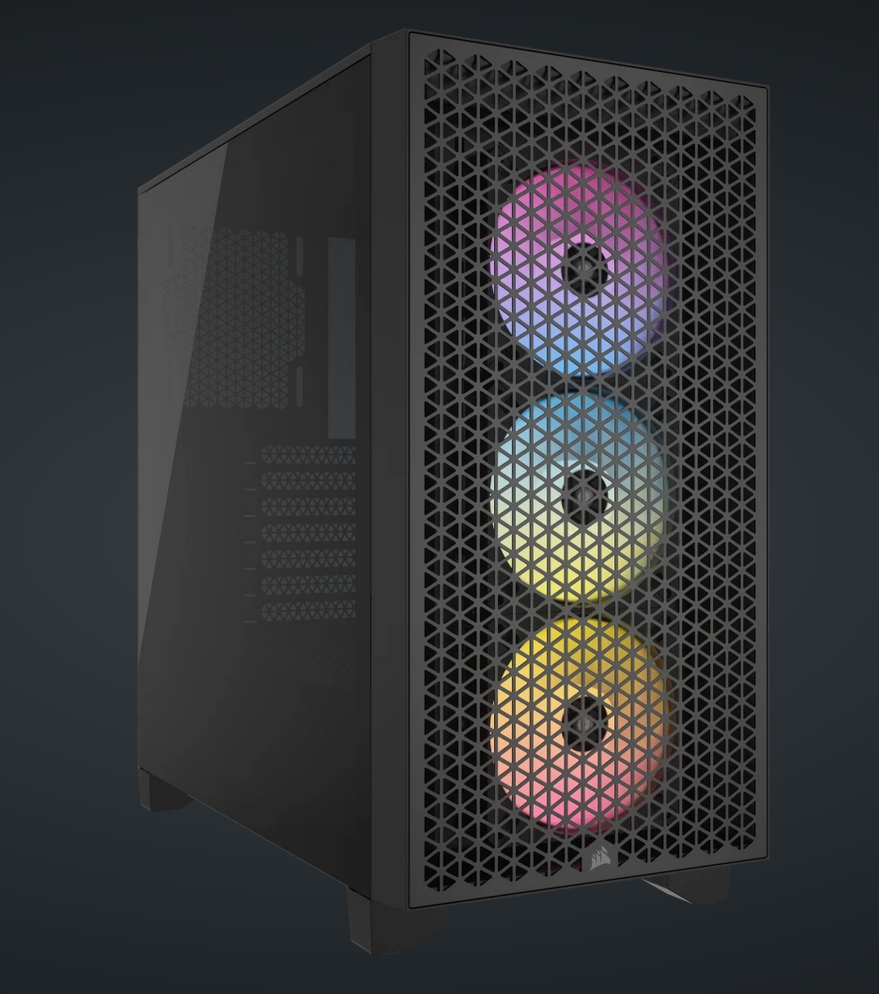
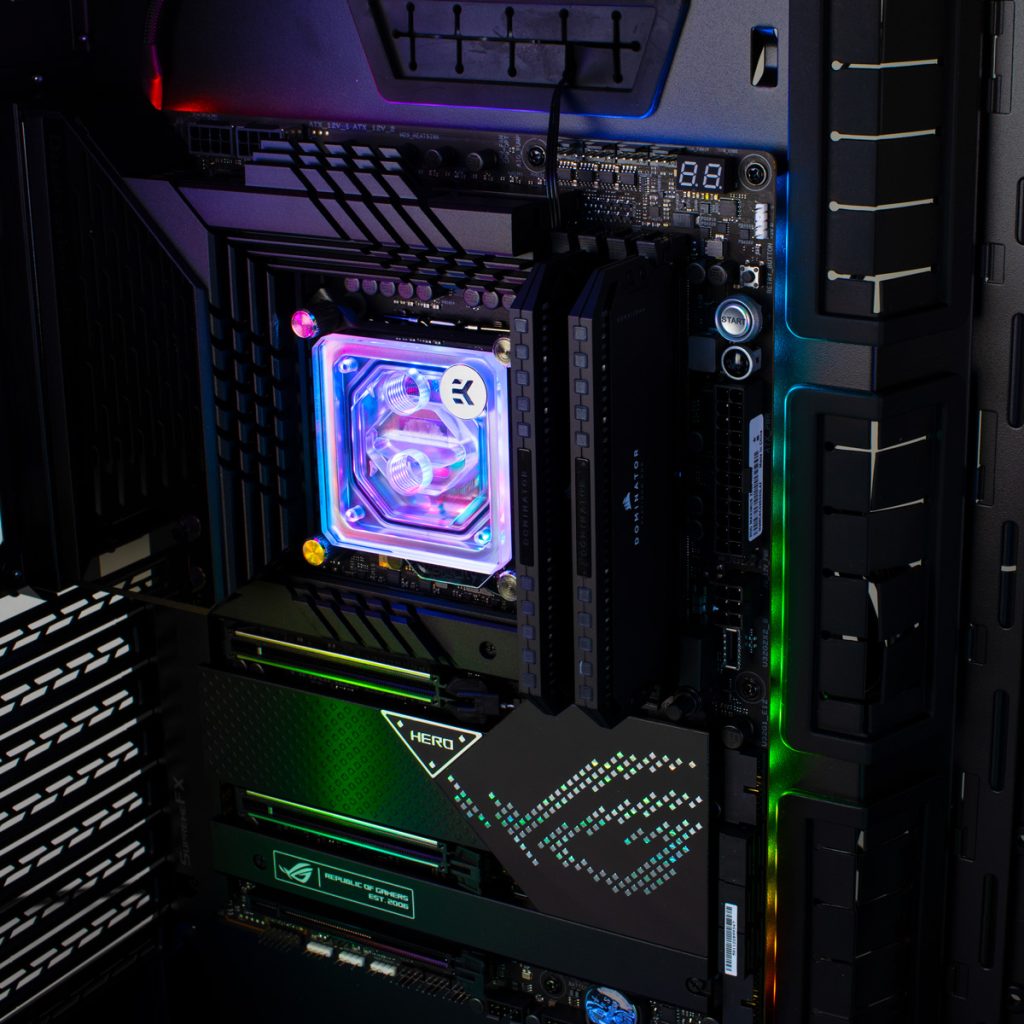
Above is a new Corsair 3000D RGB Airflow that comes out of the box with 3 x Corsair AR120 RGB fans, as cases and RGB fans go, its pretty good, we use it for some of our builds but you can clearly see the RGB on the fans is very much so exclusively for the LED fans, there is pretty much no light that finds it way to the inside of the case.
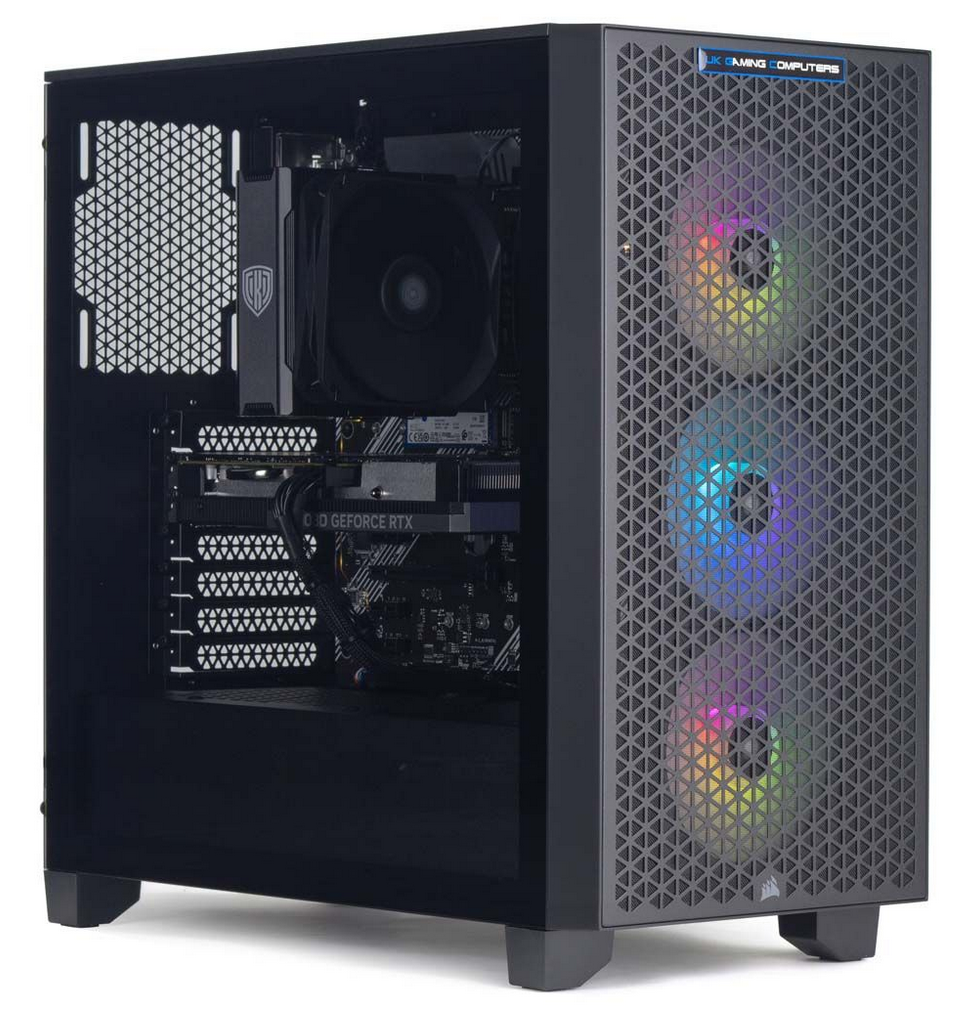
Even in the real world above, you can see how none of that glorious coloured LED lighting makes it to the inside of the computer. The only reason why you can make out the components inside is because we have a lightbox shoved up against the side of the case out of shot to highlight how neat and tidy our systems are.
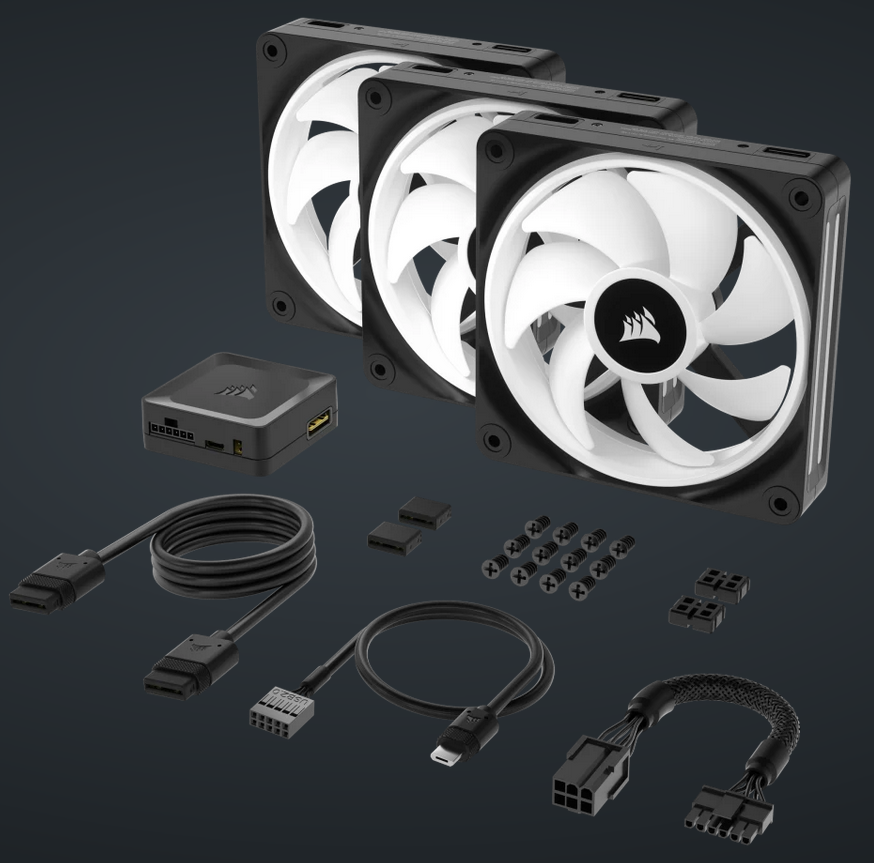
If you are just looking for that subtle localised effect then case fans are the perfect option. Just be aware a set of just 3 Corsair QX120s will set you back £144.99 and they still wont light the insides up no matter how much you spend or how many you add.
Lighting strips
To truly light up the insides of a PC you need dedicated lighting strips. One of the biggest drawbacks with LEDs is their beam angle, they very much so point in one direction and so to actually light up the inside of a computer you need quite a lot of LEDs strategically placed around the inside of a case to reach the desired effect. You can of course add in RGB RAM, RGB coolers, hell even RGB graphics cards and motherboards will give you some more of that RGB class but no matter how much you add in, its simply never going to truly do what you hope it would.
To implement lighting strips there are two ways to do it, buy a kit or do it yourself.
Buy a kit
Every brand out there pretty much has an option available to you, Corsair stuff is one of if not the most popular option;
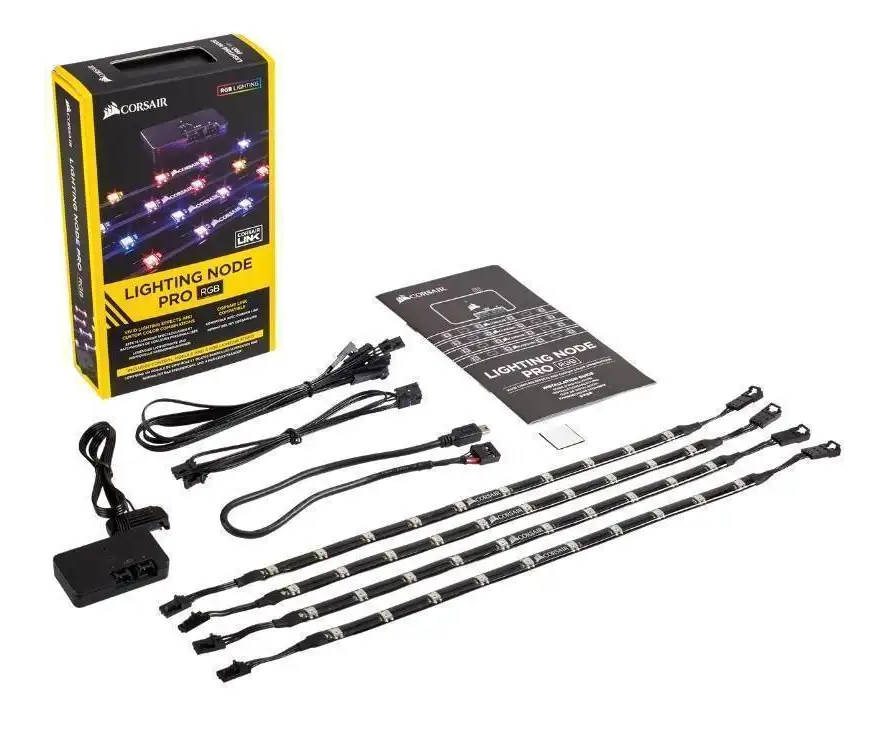
The Corsair lighting node pro. In the box you get 4 x 35cm (41cm including tail wires) strips with 10 LEDS per strip, a node controller and a few connecting cables. You basically connect the 4 41cm strips together to make a single 164 cm strip, mount them inside your case, hide the node pro controller, connect the strips to the controller and then the controller to your motherboard, install Corsairs software and away you go. At this point, it all sounds fairly simple however like every kit out there it has its drawbacks;
- Kits come in a predefined length meaning in order to light the entire of the insides of your case you have to hope the length of the kit matches up with the internal length of your case. With the lighting node pro that's ideally 164 cm which we will almost guarantee you, your case wont be. The strip will almost certainly be either be too short or less likely too long. If its too short, you are going to have dark spots where areas simply do not light up. Measuring my trusty CoolerMaster MasterBox MB520 ARGB case sat next to me right now, which is a relatively compact case it has an internal dimension of 45cm H x 43 cm W which when you add all 4 dimension up gives 176cm.
- Kits also implement these odd connectors between strips and when you connect them together you either end up bunching up all the connector wire so there is a seamless transition from one strip to another or space them out as far as possible because the strip is actually too short for the entire run of the inside of your case, if you space them out then you will have a non LED area not emitting light which looks odd. If you actually put the lengths of strip together (4 x 35cm = 140cm) you will have much less actual LED coverage which will case your coverage to be even less.
- If you work out the LED density (how many LEDS are actually in a strip and how close they are together) you will be able to see there are not actually that many. 10 LEDs per 35cm works out at less than 30 LEDs per meter which is pretty poor. The lowest spec RGB tape you can buy and make yourself is indeed 30 LEDs per meter however it is our opinion and probably any LED gurus opinion that 30 LEDs per meter is simply not enough. You have big gaps between each LED meaning you will have spots in-between that simply will not light up.
- Corsair RGB lighting is propitiatory - it only works with a Corsair RGB controller and Corsair software. Credit where credit is due, the corsair iCUE software suite is one of the better ones out there but if you want to integrate it with other RGB things, it needs to also have the Corsair logo stamped onto it effectively locking you into their ecosystem.
- LEDs used in brands lighting kits never seem to actually be that bright, I would probably go as far to say Corsair LED found in their lighting strips are at least 25% dimmer than if you DIY yourself. Most if not all brands don't even specify the types and spec of the LEDs that they use. Corsair is a great brand, we have worked with them very closely for years and in most scenarios they are very transparent with the spec of their components but when it comes to LEDs no one really pipes up to relay what they are really using and just so Corsair do not think we are Corsair bashing, Corsairs offering here is one of the better kits out there!
This may not seem like the end of the world but compared to what you can make yourself, we are getting there I promise, its pretty poor. Now you can solve the shortness issue, lack of LED density or brightness issue by simply buying Corsair expansion kits so you can connect more strips up or somehow double up each strip so there are more LEDs although this would look odd and be a pain to setup given how RGB LED data is linier, but neither the cost of all this or its actual result simply does not make sense.
If you simply picked up a single Corsair lighting node pro kit, which will do about 60% of the job (we are being generous!) it will set you back £52.99. £33.98 will get you an expansion kit of another 4 strips which will get you to about 75% of the job done, totalling £86.97. If you build your own superior kit, that will do 100% of the job, it will set you back about £10 and probably the same amount of work.
DIY
Thankfully the DIY route has never been easier. Just like Corsairs offering you will need the actual LED strips, a hardware controller to tell the strips what to do, some software to talk to the controller to configure and a connector cable. If you have built a system in the last couple of years or are building one now, the chances are you will already have 3 of the 4 parts needed!
A few years back, motherboard manufacturers started introducing RGB headers and later ARGB headers to their motherboards;
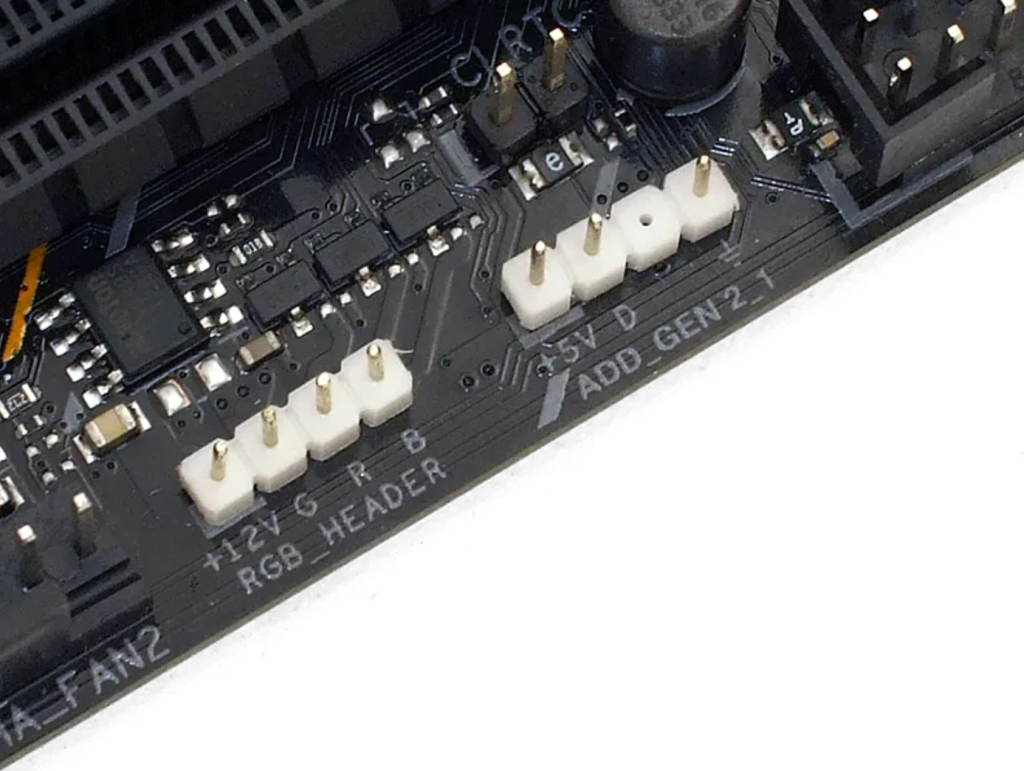
In addition to these glorious headers is an actual RGB/ARGB controller built onto the motherboard. In order to be able to use these headers motherboard manufacturers provide both their own software suite to use their controller and connecting cable of some sort which means most of the time you ONLY need the LED strip itself.
If you look closely at the ARGB header shown on an Asus motherboard (they are all the same) you will see the 3 pins have their own mark - +5v, D and Ground which translates to 5V power, Data and Ground. This is all a ARGB strip needs to ultimately link up with whatever software you want to use to control them.
Software - Lets start with the user end, this is the program that you will use in Windows (other operating systems are available) to get the controller to send the signal to your lighting strip. You essentially have a few options. The first is your motherboard manufacturers bundled software and this will of course depend on who makes your motherboard.
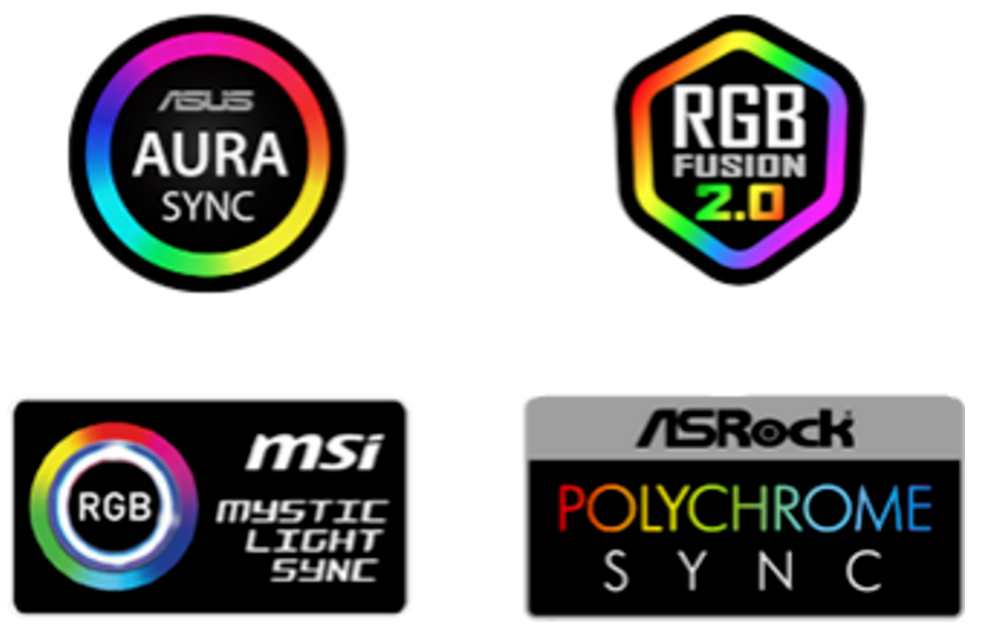
Asus Motherboards use "Aura sync", Gigabyte use "RGB Fusion", MSI use "Mystic light" and ASRock use "Polychrome Sync". They are all free and usually bundled with your motherboard drivers so if you haven't already got it installed, feel free to download the latest version from the motherboard manufacturers website. Technically, because all the manufacturers adhere to the ARGB standards they are all inter compatible however we would recommend you stick with the software applicable to your motherboard brand. As for which one is best, Aura sync is in our opinion the best followed by RGB fusion, then Mystic light and finally Polychrome sync.
You also have the option of 3rd party software, again this is all possible because motherboard manufacturers have done it correctly and all adhere to the non propitiatory ARGB standard meaning 3rd party programs will work. SignalRGB and Open RGB are the two popular ones.
Hardware Controller - As the controller is built into the motherboard there is nothing you need to do.
Connecting cable - It gets a little tricky here but because this bit is probably already been done for you there isn't really anything for you to do or get other than making a note of what connector your motherboard came bundled with.

Asus Motherboards come with a cable like above. The left hand connector is what is known as a female "JST connector" and the right more rectangular shape connection is a ARGB motherboard header, the ARGB motherboard header plugs into your motherboard noting the 5V power, Data and Ground orientation and the JST end will plug into another male JST connector attached to your lighting strip.
The actual end that connects to your lighting strip doesn't really matter too much, it just makes it easier, the goal of the cable is to simply allow you to be able to essentially extend the header from the motherboard to where you actually want your LEDs to start. As long as you have 3 wires coming out of the motherboard header its all you need - you can connect those 3 wires however you wish and even solder them directly to the lighting strip PCB. Depending where you buy your LED strip, it is very likely to come with a JST connector at the beginning of your strip anyway.
Choosing a LED strip
LED strips come in all shapes, sizes and specs and when planning a LED project you usually need to work out voltages, amps, number of LEDs, voltage drop, power injection, Logic Level conversion however because you already have a controller this is kind of already done for you because your controller will determine what it is capable and compatible with. Your motherboard manual will state the important bit you need to pay attention to;
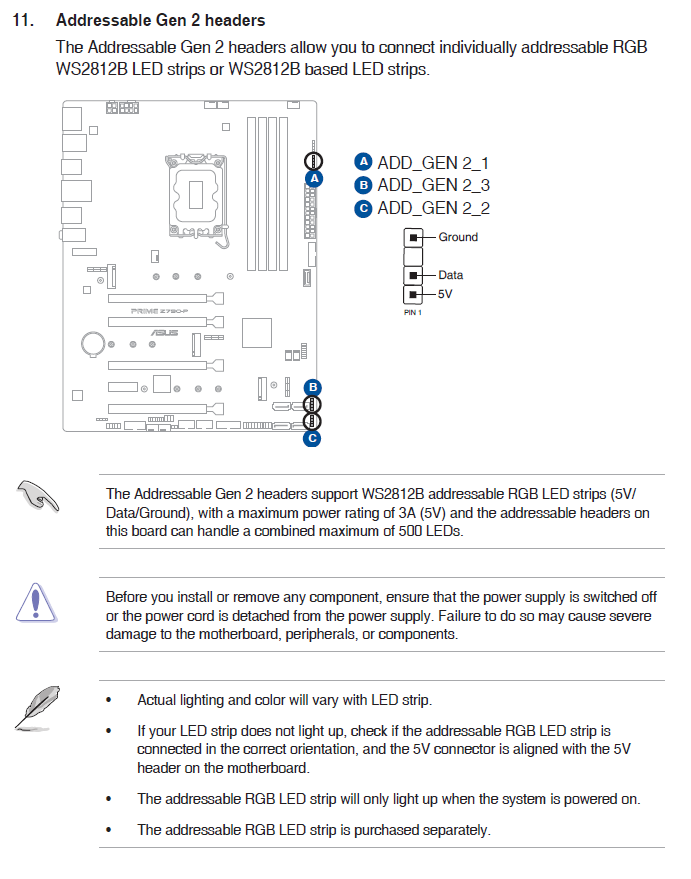
The two things that are important is the Voltage, in this case 5V which they all are and secondly the maximum power rating measured in Amps, in this case it is 3A. Volts essentially determines the type of LED strip you can use - 5V, 12V or 24V, they are NOT inter compatible and for computer installs what voltage strip you have makes pretty much no difference. The Ampere will determine how bright your LEDs will be and given the latter is built into your motherboard, you have no control over this unless you opt for a 3rd party controller which you do not need to do.
Common LED Strip types
WS2812B - These are by far the most commonly used ARGB strips in 2024. They are extremely cheap and will do what you will want 90% of the time. There are cheaper older alternatives such as the WS2811 and WS2812 but the cost difference is marginal and the extra features of the WS2812B is worth having and these would be our recommended option. The name comes from the chip type in the LED. There is also a "ECO" version, and 95% of LED strips that are controlled by WS2812B and labelled as WS2812B strips are ECO versions especially if its not stated. Non ECO versions are made with copper and pure gold and ECO versions are made with brass and a gold "admixture", in other words not pure gold. You will generally find your supplier will offer a longer warranty with non ECO versions and the IV Value on each colour is better however in the real world the difference in IV is not noticeable and quite frankly LED strips do not fail. The only real use case for non eco strips is if you are installing them somewhere where its impossible to service them at a later date however there are much better suited LED strips out there that build in failure protection. As we are working with computers, we see no need to use non ECO versions but the choice is of course yours.
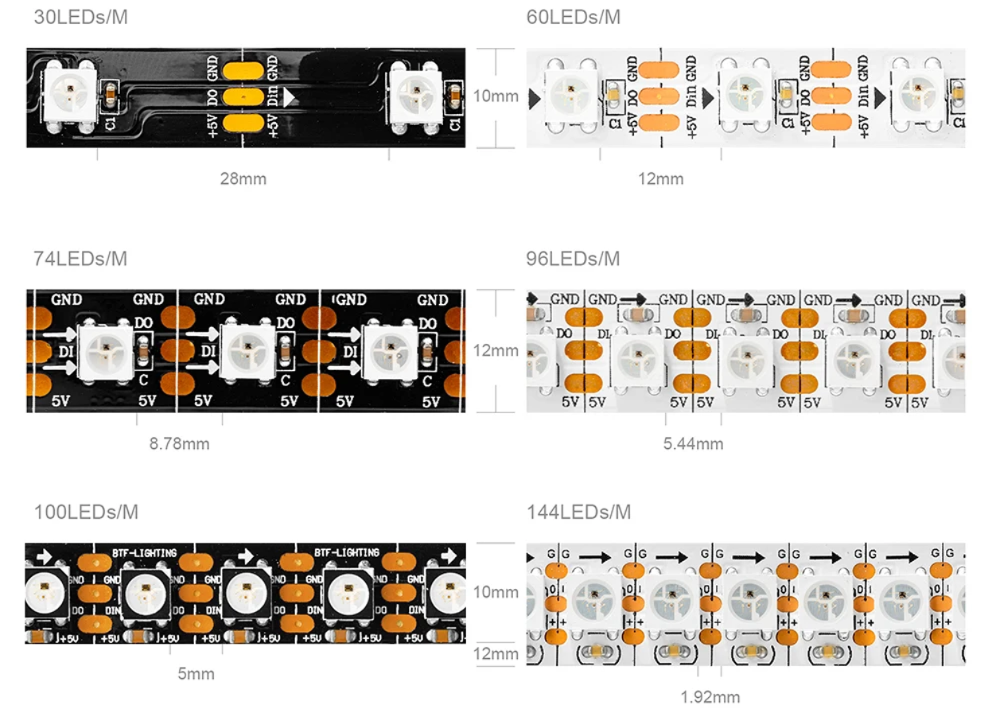
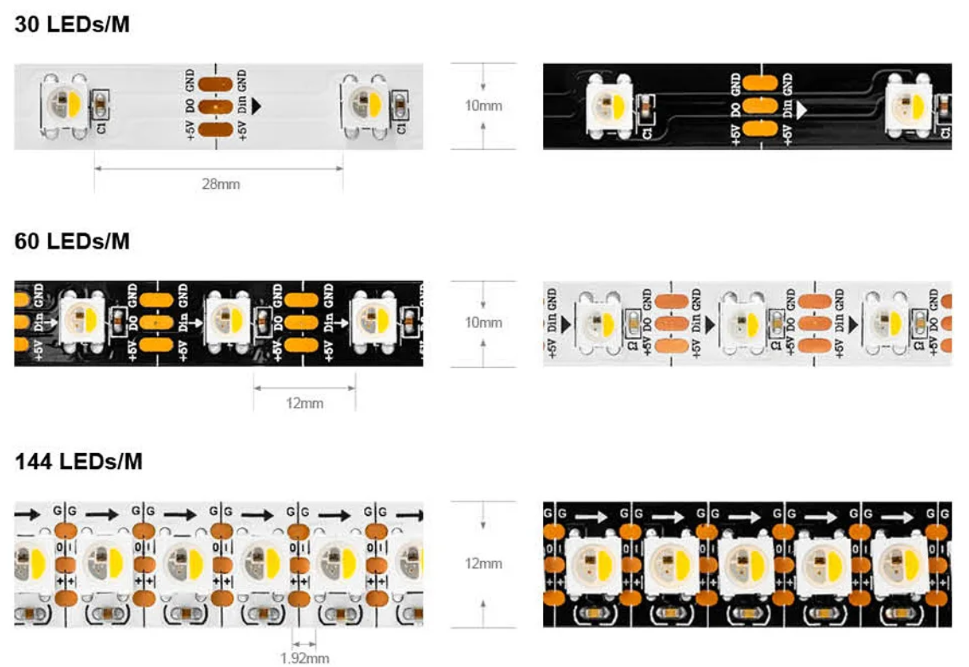
LED Density - Like all LEDs strips, they come in different LED densities. The denser the LEDs the more uniform the light is and the "smoother" the lighting looks. Lower density strips suffer from something called shadowing, its essentially where you do not get light between the LEDs because they are spaced too far apart. Now before you go running out to buy 144 LEDs a meter strips let us tell you now that 60 LEDs a meter is enough. 30 LEDs/M does definitely suffer from shadowing but with 60 LEDs/M it is all but eliminated. For reference, the all popular expensive Corsair Lighting node Pro kits have 30 LEDs/M.
PCB Colour - In addition, you also get to pick your PCB colour. Commonly they come in black and white. Go for a black strip if the insides of your case are black and a white strip if the insides of your case are white if you want the strip to blend in.
Waterproof rating - LED strips also come in different waterproof ratings, these are commonly IP20/30, IP65 & IP67. Given you are not using your LED strip in a swimming pool or wrapping them around your decking you will want to pick IP20 or IP30.
How long - You are going to need to choose how long you want your LED strip to be and this will depend on how many and where you want to install them. We personally believe ARGB lighting looks best in one continuing strip all the way round the inside of your case however not all cases will let you do that due to the mounting channel being too thin or you may simply prefer just having say the top of the case light up or perhaps just both sides or perhaps just want a specific component lit up like behind a reservoir or to highlight your shiny graphics card. This is entirely up to you. LED strips come in either .5M or 1M increment lengths, so if you plan on going all the way round add up your top, bottom and both side dimensions to work out how much you need and order the size that will cover it all. 90% of cases will be under 2 meters and unlike most of the kits you buy LED strips are designed to be cut with a pair of scissors at the copper solder points on the PCB so you will be able to get your strip pretty accurately sized if its too long.
Price - Shop around. LED strips can be brought from almost anywhere, Amazon, Ebay and AliExpress will all have varying prices and delivery times. Read reviews as all LED strips are not created equal, some are brighter, better colour scales, higher efficiency. Over the years we have tried and tested probably hundreds of strips and we use BTF Lighting for all our strips. 2M WS2812B 60 LED/M IP 30 Black PCB with JST connector at the beginning will set you back just £4.61!
SK6812 - These are relatively new, they act very similar to the faithful WS2812B, also come in 5V but they differ as they have a dedicated white diode on the LED itself. Most ARGB and RGB LEDs create white by simply upping all 3 Red, Green and Blue channels to max brightness however creating white this way tends to result in a blue/purple tinge to them, its close but side by side the difference is night and day. If you are a purist, you can get SK6812 in 3 versions, Cool White, Warm White an Natural White where the dedicated white diode does all the white work resulting in a much truer colour. SK6812 Will NOT work with a motherboard header, you will need a dedicated 3rd party controller.
As you can see they also come in varying LED densities, PCB colours and waterproof ratings. 2M of SK6812 60 LED/M IP 30 Black PCB with JST connector at the beginning from BTF lighting will set you back £12.92. Its worth noting that no prebuilt kit, case or fan comes with SK6812 LEDs other than from us when ordering a PC so if you go down this route you become part of the exclusive club and given both options cost you next to nothing its worth doing.
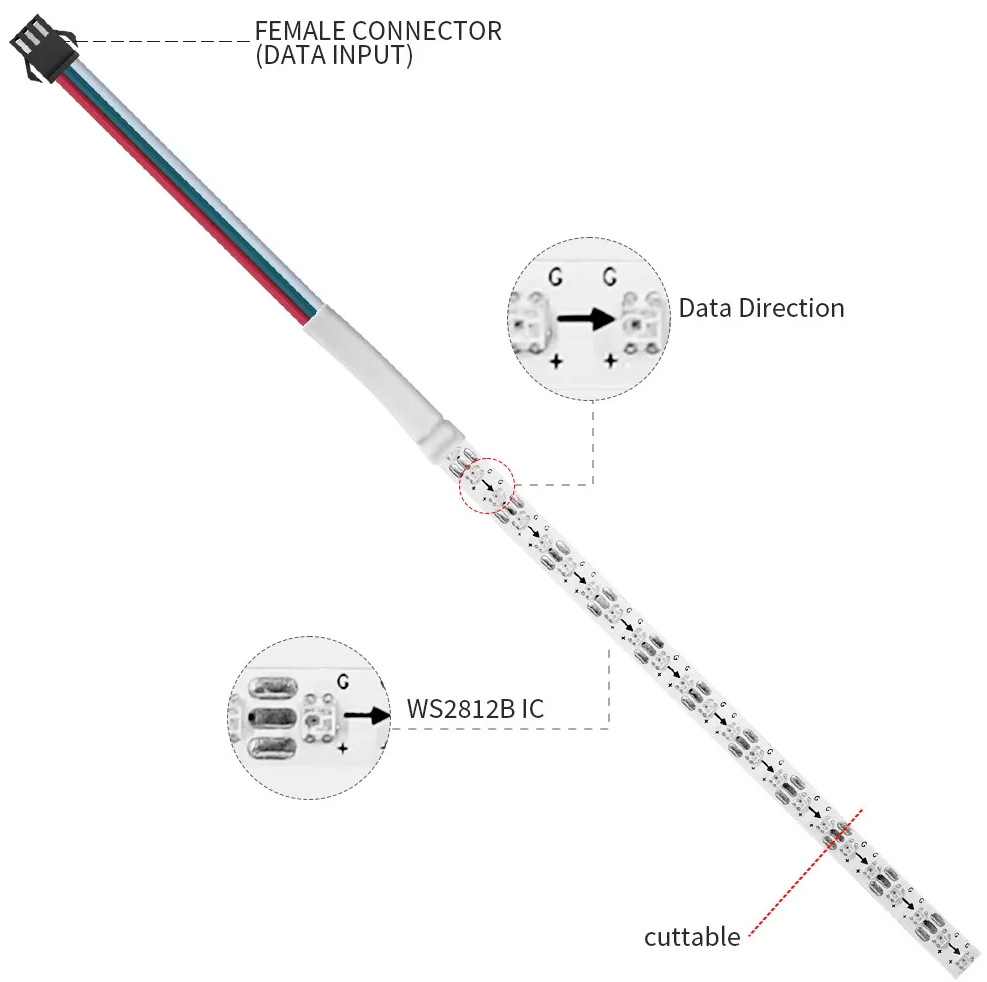
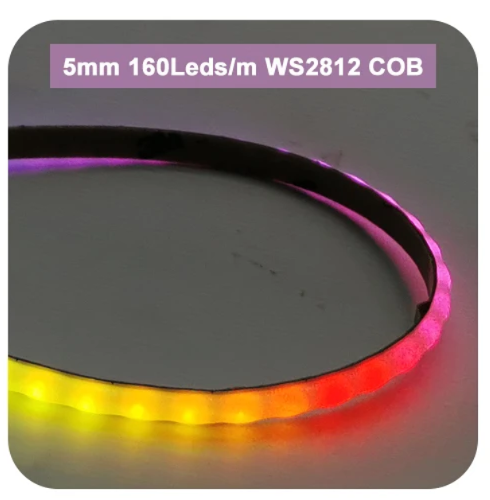
Narrow 5mm WS2812B - LED tape commonly comes in 10 or 12mm widths. This is usually thin enough to be able to shoehorn around the inside of your case however all cases are different and sometimes a 10mm strip simply wont fit. Well you can buy "narrow LED strips" which are usually 5 or 8mm. They utilise smaller SMD LEDs such as the SMD 2020 which measure 2mm x 2mm compared to normal SMD 5050 LEDs which measure 5mm x 5mm. It does mean they output less light and therefore are not as bright but we think you will be more than happy with their light output anyway. We use narrow 5mm WS2812B led strips when we build motherboard underglow lighting here;
As SMD 2020 LEDs are smaller and output less light we would recommend upping the LED density to 120 LEDs/M or even 160 LEDs/M if you are trying to light up an entire case. 2M of Narrow 5mm WS2812B 120 LED/M IP 30 Black PCB with JST connector at the beginning will set you back £9.93.
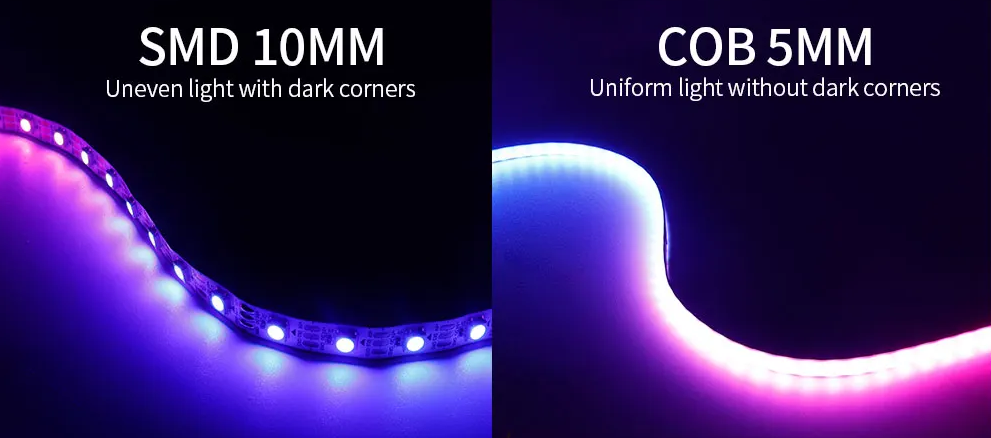
COB LEDs - These are relatively new. It stands for Circuit On Board and is also sometimes called FCOB (Flexible Circuit On Board which is what most people thinks it stands for but its actually Flip Chip On Board). Traditionally you have your PC strip and affix a LED to it, COB LEDS actually integrate the LED to the actual tape itself which allows two things, you can fit the LEDs much closer together as you are doing away with the actual LED housing and because they are now flatter it is possible to then install a optional phosphor silicone mixture over the top to create a built in diffuser to improve uniformity and beam angle. This time the LEDs are significantly smaller so you will be looking at a LED density of like "720 LEDs/M" (its really 240 LEDs/M) you can also get them in 10mm widths as well as 5mm widths however they are all 12v or 24v meaning unless you use a 3rd party controller you wont be able to use them with a motherboard header and they only use a WS2811 chip (incorrectly named "IC") meaning you don't actually get to control every single LED, only banks of 36 (12 if correctly named) at a time so each LED doesn't really bend into the next. A 2M length with 720 LEDs/M will set you back around £9.12

Now whilst its not practical for most if not everyone to currently use true COB style lighting because its 12 or 24V and each bank of individually controllable LEDs is quite long for PC lighting however single colour versions such a white only are absolutely brilliant for home LED strip installs. The purpose of telling you about this LED you almost certainly are not going to use, is the term COB/FCOB has kind of coined a strange badly named hybrid.
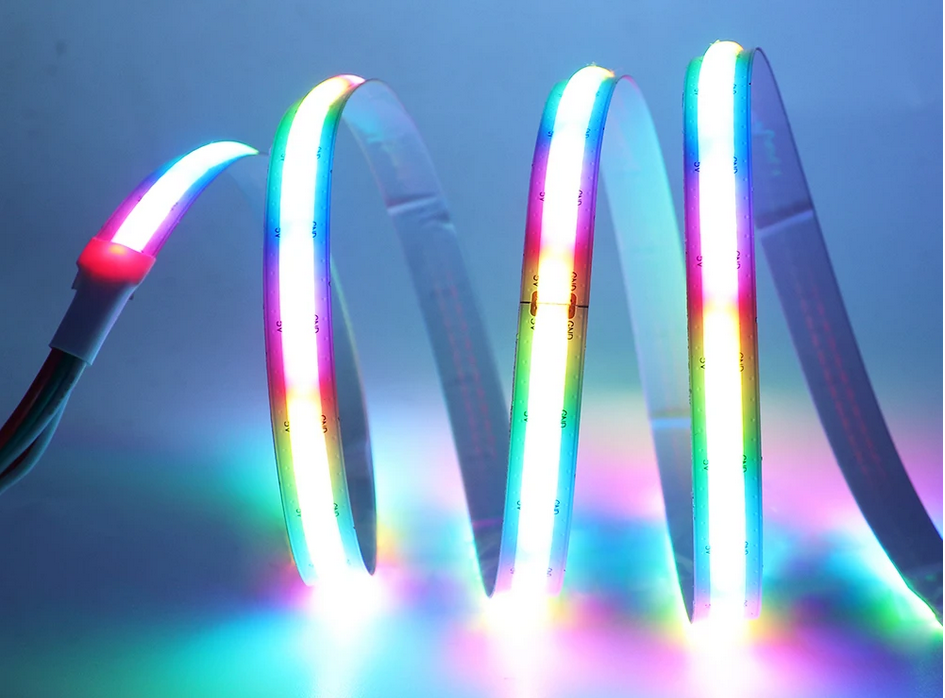
Phosphor Silicone Mixture - Now we know COB stands for Circuit on Board however it is a very common misconception that COB/FCOB means that the Phosphor Silicone Mixture diffuser cover mounted over the LEDs is present. Its understandable because COB by default comes with this milky diffuser/cover. What we have noticed is manufactures are now taking different versions of WS2812B controlled strips and slopping this Phosphor Silicone Mixture over the top of the SMD LEDs and marketing them as COB true IC ARGB. They are of course indeed true IC ARGB with up to 200 LEDs/M but they use SMD LEDs rather than COB LEDs.
Marketing wise, they look amazing but if you look closely you can see the bumps in the defusing cover indicating the SMD technology underneath rather than the COB technology;
Notwithstanding, they are also a viable option, the added diffuser built into the strip combined with larger LEDs per M mean you get practically no shadows and a higher resolution of LEDs as there are more crammed into a meter length. 2M of these "COB" Narrow 5mm WS2812B 160 LED/M IP 30 white PCB will set you back £9.63. The problem is, they don't really have a proper name other than "WS2812 COB" and finding them can be a bit tricky and given that there are so many LEDs its unlikely that your 3.5A ARGB header will be able to power them alone and you will probably need power injection depending on how long your run is.
Real COB WS2812B - It will take a little bit of hunting but they do exist! Again they are marketed as COB LEDs and the giveaway is a smoother Phosphor Silicone Mixture over the top and when viewed from the back you should be able to see "lines" of led shining through rather than a single SMD "dot".
The Holy Grail? - Of course we are always playing with LEDs for fun and there now appears to be a new kid on the block. SK6812 RGBIC COB LED Strips appear to be real COB LEDs mounted into the PCB itself that have a SK6812 controller and presumably a dedicated white diode in there somewhere. In addition they are being offered in a whopping 332 LEDs/M. Sellers seem coy but they seem to look the part;
As for price 2M will set you back £51.73 which seems insane, but its cheaper than a pre made kit! We of course have some on the way which we plan on playing with and chopping up to see what controller they are using and if the dedicated white diode is present. Also before you run out to buy some, there is no way 3A of power will be able to cope with this many LEDs and they will almost certainly need some kind of power injection.
Lets talk Power
We haven't really covered this so far so we need to touch on it. When you plan on any LED project, you need to ensure you appropriately power your LED strip based on how many LEDs you have. As we are using built in motherboard headers our power supply for the LEDs is already pre determined and is clearly stated in the motherboard manual. An Asus addressable Gen 2 header provides up to 3A of power, at 5V this is 15W. Most LED strip manufacturers will do 2 things, state their power usage per LED in Watts and secondly, lie!
Remember BTF Lighting, they state very clearly on their product page a single SMD 5050 WS2812B controlled LED will use 0.3W irrelevant if its an ECO version or not. At 60 LEDs/M density that's 18W per meter when each LED is at full brightness when displaying white (all RGB diodes at full brightness). Its likely you are going to be working with up to 2M of strip and if you do, you apparently are going to need 36W of power to power them all sufficiently. This of course falls short of the 15W of power you only get from your motherboard header.
So what actually happens if you do not have enough power? Simply put, each LED will be dimmer and your controller will automatically do this and given you have less than half the power needed to display the LEDs at full brightness the theory is at this stage is your 2M 60 LED/M strip will be running at less than half brightness. This is all however not the real world;
- Around half brightness - is actually plentiful to light up the insides of a PC, display wicked effects and we would be confident in saying you would be more than happy with your LED strip at half brightness. As you read on, you will find you wont actually be at half brightness.
- SMD 5050 WS2812B do not use .3W each - I'm afraid to say it but whoever you buy your LEDs from they will lie to you. A 1M of BTF Lighting 60 LED/M WS2812B strip used and tested in the real world will actually use around 9.3W at full power and brightness, not 15W. There are plenty of reviews and resources out there and it does vary marginally from brand to brand, but when LED strip manufacturers state a wattage its their way of kind of saying, our strip is better and will be brighter than someone else's.
- SMD 5050 WS2812B will only use full power if every single LED is set to white at a single time. As we have mentioned, to achieve white all 3 R,G & B diodes needs to be fully/evenly lit. Lighting 60 diodes just Red the strip will use around 4.8W, Green fully lit uses around 4.6W & blue just 2.8W. Most of the time your LED Strip will be displaying effects that have multiple colours rather than just white, for example the most popular "rainbow" effect uses around 3.9W when you have 60 LEDs going at it. These numbers are real world numbers, not the pretend numbers manufacturers and sellers make up.
If you are concerned about not having enough power, because you plan on installing them to a really big case, then use SK6812 LEDs. 60 LEDs will in the real world use around 7W fully lit on white which on paper will give you around 2.15 meters of 60 LED/M at full brighness. All SK6812 LEDs use around 4.2W per colour, this is slightly less for Red and green compared to WS2812B but is more for blue only. The rainbow effect on SK6812 uses a similar amount of power as the WS2812B at 4.2W and 3.9W respectively.
For the other fancier strips we have mentioned that have more LEDs/M we have also stated its likely they will need "power injection". This is a process of essentially plugging in more power to a specific point on the LED strip. Motherboard manufacturers are now starting to include 2 or 3 ARGB headers to their boards and there is absolutely nothing stopping you connecting up multiple strips to multiple headers. We are currently in the process to see if we can use the 5v & ground pins on the other headers as power sources to inject power to to the more hungry strips with more LEDs so watch this space.
Conclusion
Buying a kit is of course the easy solution however it is expensive and in our honest opinion doesn't really achieve the full potential of what LED lighting in your PC can achieve nowadays. You more than likely have 3/4 of what you actually need and realistically its just a case of going out and buying your preferred LED strip.
For 95% of you that is picking up a 2 meter strip of WS2812B 60 LEDs/M, running it around the inside of your case and chopping of the end that you don't need and simply plugging it into your connecting cable that connects to your motherboard header and away you go with your preferred LED software all for less than £5!