1 – Only One Tool Required
Removing and installing RAM in a PC is one of the easiest things you can do. The only tool you potentially need to do this is a Phillips/Crosshead screwdriver to remove the screws holding the case side panel on.
2 – Getting the Right RAM
At this point it is important to point out that if you are replacing or adding additional RAM modules you should always check that the replacement modules are compatible with your motherboard, a list of compatible modules should be available from the motherboard manufacturer’s website.
This is especially relevant with older motherboards, as you don’t want to go spending a load of money on brand new DDR4 RAM if your motherboard only supports DDR3 RAM or even earlier module types, these mistakes are easily noticed when the RAM module won’t fit into the DIMM slot!
When adding additional RAM modules you should also make sure that the RAM modules you are adding are the same RAM modules that are already in the PC, the easiest way to do this is to get the model number from existing RAM modules and purchase the same model. A PC can work with mis-matched RAM modules but making sure all the RAM modules are the same model will eliminate any possibility of this causing the PC not to work.
You will also want to check how many DIMM slots your motherboard has. Some motherboards will only have two, some four and some as many as eight DIMM slots, but you can only add additional RAM modules if you have enough DIMM slots available.
3 – Protecting Your PC
Before opening your PC one final hazard to take into account is static electricity and what measures you need to take to protect your PC from, as static electricity can easily cause damage components and cause the PC to not work. To do this you can purchase an antistatic wrist strap which will ground you when working on the PC, you can also simply ground yourself by touching a metal part of the PC when it is powered down and unplugged. You should also avoid standing on carpet when working on a PC
Once you are ready to remove/install the RAM you will need to turn your PC off, unplugging the power lead from the back of the PC is also a good idea as it will stop you from accidentally turning the PC back on it will also remove any remaining charge in the PC if the power button is pressed after the PC is powered down and unplugged.
4 – Getting Started
When the PC is powered down and unplugged you can remove the side panel to access the PC components, this will usually be the left hand panel when facing the PC. To remove the panel you should consult the case manual that came with the PC, as this will instruct you on the correct way to open the case. Though on most PC cases the side panels are held in place by two screws at the back of the PC that need to be removed.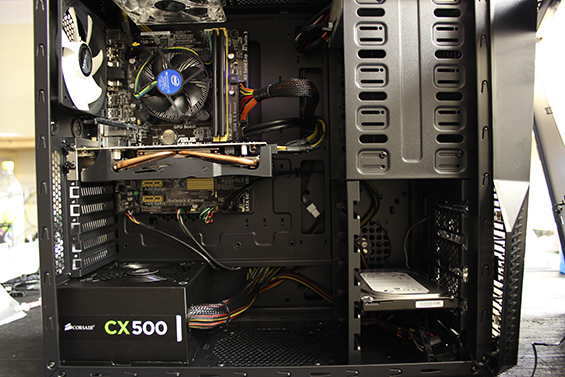
Once inside you can access the components, you should see the RAM modules in the Motherboard, these will be sitting in the DIMM slots. Depending on the Motherboard type, these are usually to the right of the processor cooler but can sometimes be to both the right and left.
5 – Removing the RAM
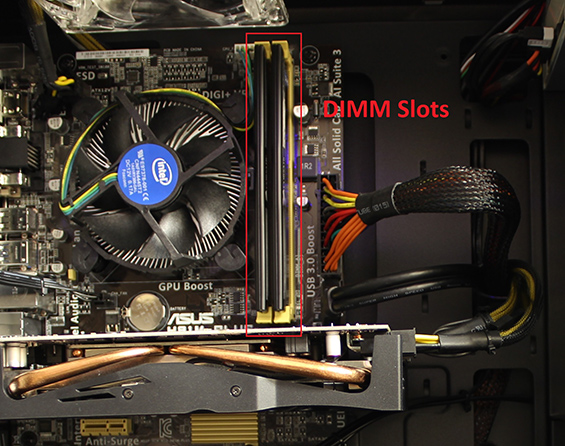
To remove the RAM modules you will simply need to press down the tabs at either end of the slots the RAM modules fit into, though some motherboards will only have one tab on the DIMM slot, which is becoming more common. Before you go pushing tabs its is advisable to either lay the system down so the top of the RAM module it pointing up or hold onto it with the other hand as often the RAM stick can launch itself out of the slot and obey the laws of gravity to plummet to a potentially damaging floor or bottom of a case.
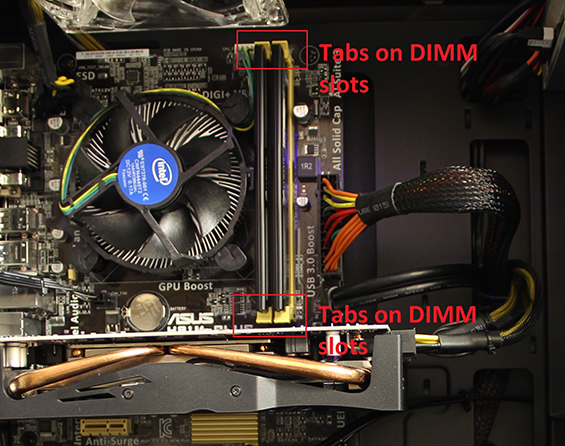
Once the tabs have been pressed down, and the module hasn’t jumped out at you, then you should be able to pull the RAM module out of the motherboard, this should only take some firm pressure. If the RAM module does not come out easily, double check that the tabs on the DIMM slots have been pressed down fully, do not try and force it out as you could damage the RAM module or the slot.
Once the RAM module is removed you can check what the model number is as this will be printed on the side of the RAM module, along with the size speed, timings and voltage for the RAM module.
6 – Installing RAM
To install the RAM modules you simply need to put them back into the DIMM slots, when doing this check the grooves in the DIMM slots and you will notice that one is longer than the other with a notch somewhere in the middle, this will match up to which way round you need to install the RAM modules, as this will have a corresponding notch where the module fits into the DIMM slot.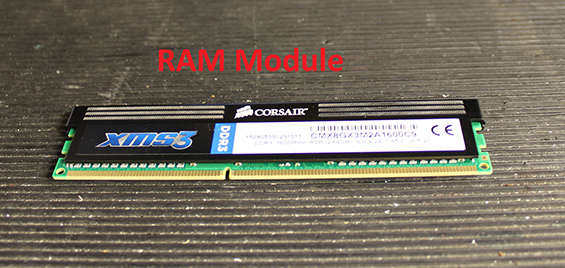
When inserting the RAM module into the slot, push down with firm pressure at each end of the module. The tabs should then click into place and hold the RAM module in place. For motherboards with just one tab on the DIMM slot, you need to follow the same procedure - push down with firm pressure at each end of the module, you should still feel a click when the RAM module has been fitted correctly into the end without a tab as well as the end with a tab.
Once fitted correctly you can then turn your PC back on, from here you should enter the Bios and check that the RAM is set to run at the correct speed and with the correct Voltage, these values can either be set manually after consulting the information on the side of the RAM module, or if you have a modern motherboard, you should be able to implement any settings by activating XMP (Extreme Memory Profile) which will also set the timings for your RAM module.
7 – Final Checks
For most motherboards you will be able to check that you have the correct amount of RAM installed showing in the Bios, however if you can’t find this you can always check the amount in Windows by accessing the System screen from the Control Panel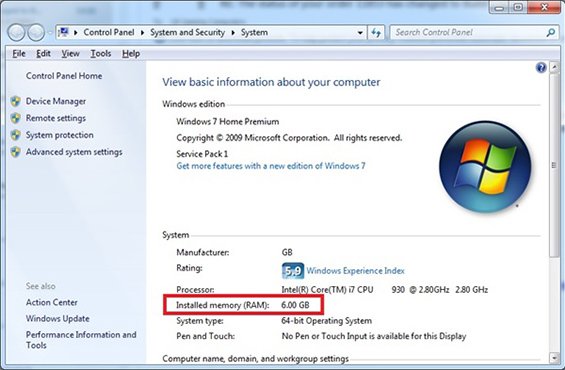
Obviously if the correct amount of RAM is not showing up, then you should repeat the process to remove and put the RAM back in case one or more of the modules haven’t been seated correctly in the slots. If this still doesn’t work you can test the RAM modules one at a time and also test the DIMM slots in case either are faulty and don’t work.
Finally you should also test you RAM for errors in case you have received a faulty module or modules, even if brand new RAM can develop faults and whilst your PC may seem to be working correctly, faulty RAM will cause further issues down the line.
A simple way to test your RAM is to following our guide to do this, which can be found here.

